When you order materials from a supplier or sub-contract a portion of the work, purchase orders keep everything tracked. Conduit covers the full cycle: vendors, POs, approvals, receiving, bills with three-way match, and a portal where your vendors acknowledge orders without needing a Conduit account.
01Set up vendors
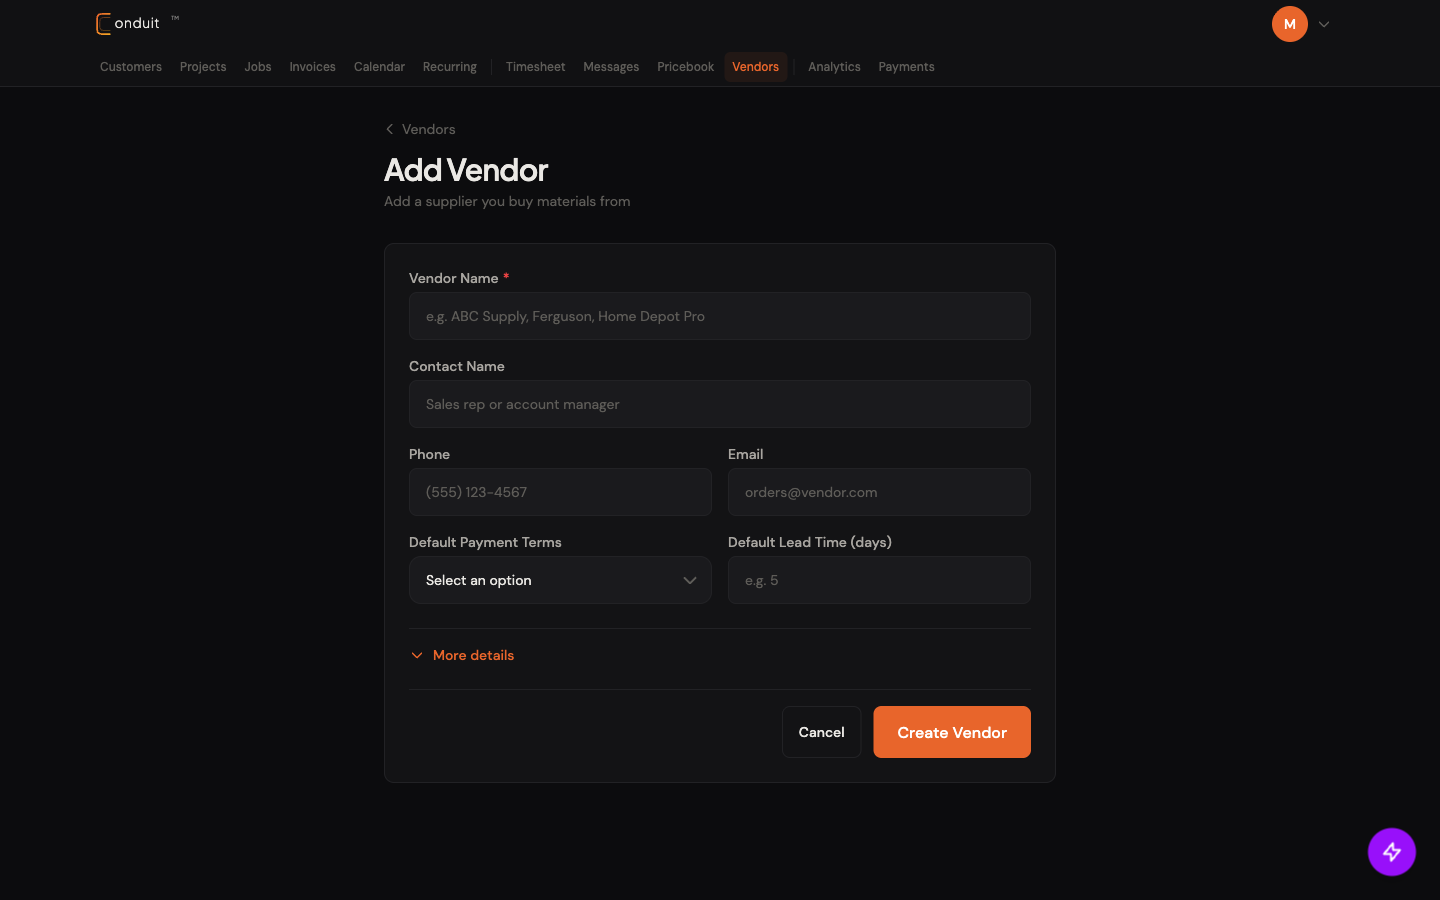
Open Vendors in the top nav and click + Add Vendor. Vendor setup is one-time per supplier. Defaults you set here pre-fill every PO you create with this vendor.
- Vendor Name. Required. The supplier’s business name (e.g., “Granite State Electrical Supply”).
- Contact Name. The sales rep or account manager you typically deal with.
- Phone. Vendor’s phone number for follow-ups.
- Email. Where order acknowledgments and PO emails go.
- Default Payment Terms. Net 15 / Net 30 / Net 60. Pre-fills the Terms field on every PO you create with this vendor.
- Default Lead Time (days). Typical delivery turnaround. Pre-fills Expected Delivery on POs based on the order date.
- More details. Collapsible fields for address, your account number with the vendor, tax ID for 1099 tracking, and notes (pickup hours, delivery quirks, “ask for Mike on Tuesdays”).
- Create Vendor. Submit. Vendor lands in your list and is selectable on POs.
- 1. Vendor Name
- 2. Contact Name
- 3. Phone
- 4. Email
- 5. Default Payment Terms (Net 15/30/60)
- 6. Default Lead Time (days)
- 7. More details (address, account #, tax ID, notes)
- 8. Create Vendor
02The PO detail page
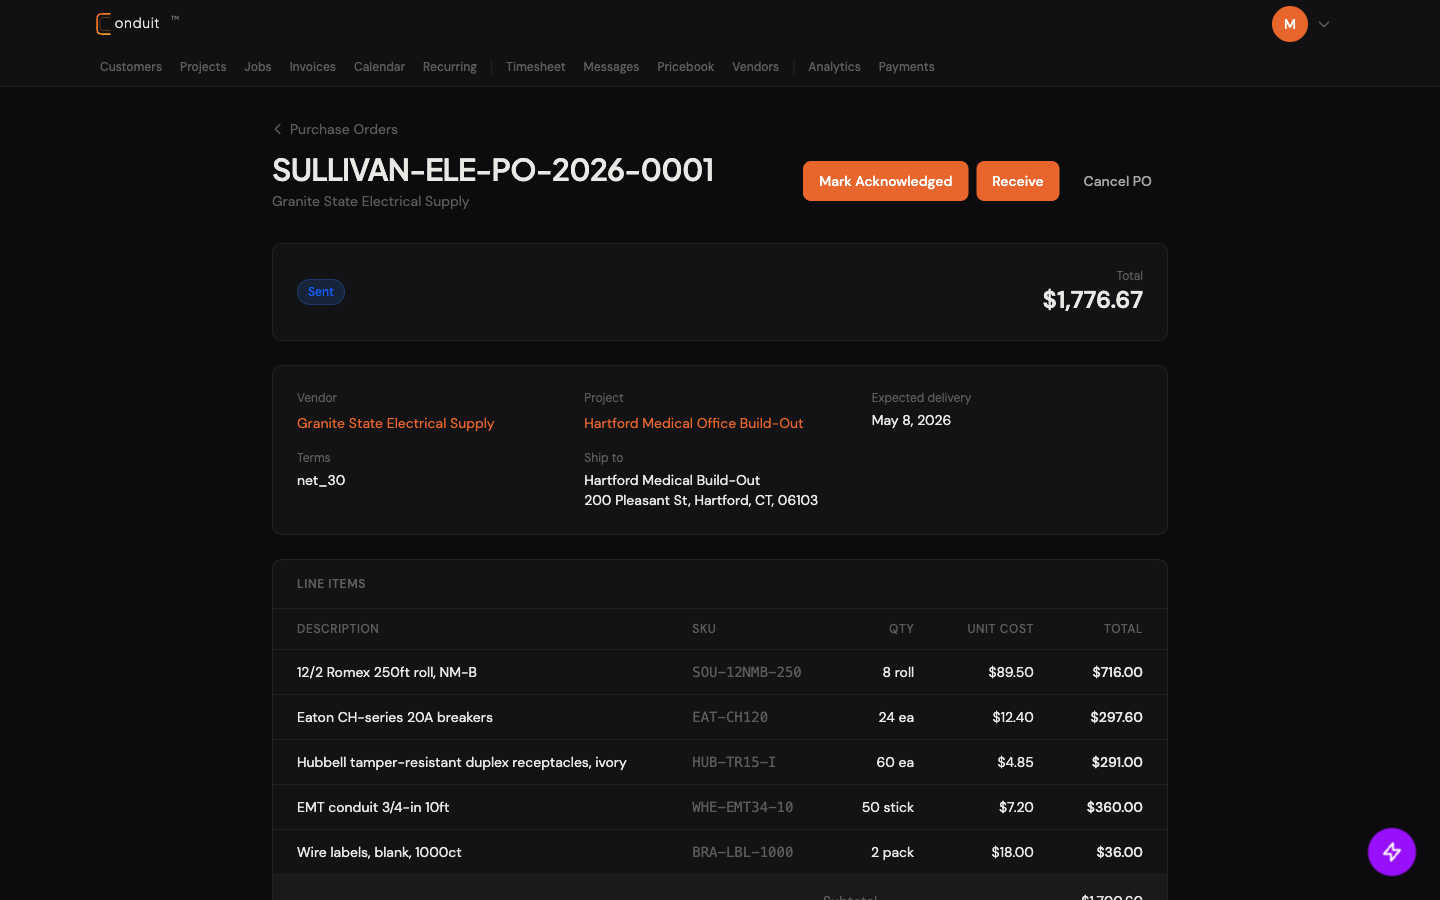
From the Purchasing page (or a project’s POs tab), click + New PO, fill in vendor + project + line items, and save. The screenshot below is the PO detail you land on after creation. It is the same view you return to throughout the PO lifecycle.
- Auto-generated PO number. Based on your company short-code + year + sequence (e.g., SULLIVAN-ELE-PO-2026-0001). Reference this with the vendor.
- Mark Acknowledged. Click when the vendor confirms they got the order and will fulfill it. Status flips to Acknowledged.
- Receive. Opens the receiving modal (covered in tab 05) when materials arrive.
- Cancel PO. Kills the PO with a reason logged. Status flips to Cancelled.
- Sent status badge + Total. Live status chip + the PO’s total dollar value at the top of the card.
- Vendor. Link to the vendor detail, Granite State Electrical Supply in this example.
- Project. The project this PO is committed against. Cost rolls up to the project’s Committed Cost card.
- Expected delivery. Computed from the vendor’s default lead time + order date; override per-PO.
- Terms. Pre-filled from the vendor’s default payment terms (Net 30 here).
- Ship to address. Defaults to the project address; override for direct-to-jobsite shipments.
- Line items. Description / SKU / Qty / Unit cost / Total per row. Subtotal + tax + shipping + total at the bottom (below the visible viewport).
- 1. Auto-generated PO number
- 2. Mark Acknowledged
- 3. Receive (opens receiving modal)
- 4. Cancel PO
- 5. Sent status badge + total
- 6. Vendor (link to vendor detail)
- 7. Project (committed cost flows up)
- 8. Expected delivery date
- 9. Terms (Net 30, etc.)
- 10. Ship to address
- 11. Line items (description, SKU, qty, unit cost, line total)
Vendor notes (visible to the vendor) and Internal notes (your team only) live below the line items section.
03Approval workflow (for thresholded POs)
If your company has PO approvals enabled (Settings → Company → Purchasing), orders above a threshold need sign-off before sending.
- Pending Approval status on submission.
- Admin or owner reviews. They see the PO detail with full line items.
- Approve. Clears the approval requirement and returns the PO to Draft so it can be marked as sent.
- Decline with reason. Clears the approval requirement, returns the PO to Draft, and stores the decline reason on the PO. There is no separate Declined status.
The threshold and required approver roles are configurable. Most contractors set $1,000 or $5,000 as the threshold; some leave it off entirely.
04Mark as sent and share the vendor portal
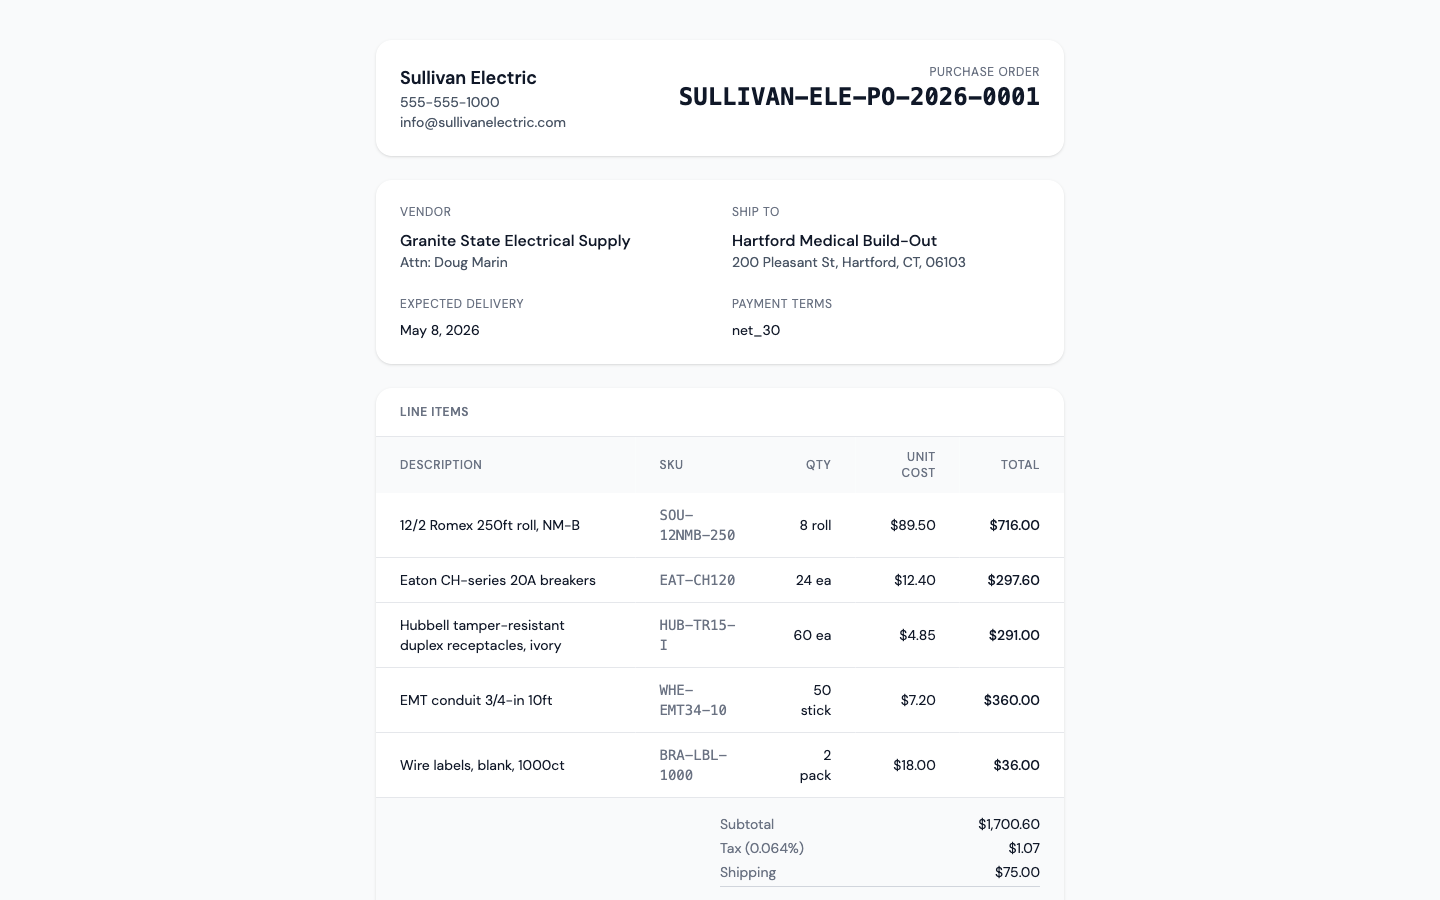
Once approved (or always, if approvals are off), click Mark as Sent. That moves the PO into Sent status and unlocks the shareable Vendor Portal link. Copy that link and send it to the vendor by your normal channel. The portal does not require a login or Conduit account. Acknowledgment from the portal flows back to your PO detail.
- Your company branding. Your company name + phone + email at the top-left so the vendor knows it’s a real PO from you.
- PO number. Top-right header, same number you see on your side.
- Vendor card. Vendor business name + “Attn: [contact]” so it lands with the right person.
- Ship to address. Where the materials should be delivered.
- Expected delivery. The date you committed on the PO.
- Payment terms. Net 30, etc., so they know what to expect.
- Line items table. Description, SKU, Qty, Unit cost, Total. Same data as your PO detail, formatted for the vendor.
- Subtotal / Tax / Shipping breakdown. Right-aligned totals at the bottom.
- 1. Your company branding
- 2. PO number
- 3. Vendor card (Attn: contact)
- 4. Ship to address
- 5. Expected delivery
- 6. Payment terms
- 7. Line items table
- 8. Subtotal / Tax / Shipping breakdown
The Acknowledge button sits below the totals (off-screen in this crop). One click confirms the order; status flows back to your PO detail. As you receive items, the vendor portal updates too.
05Receiving
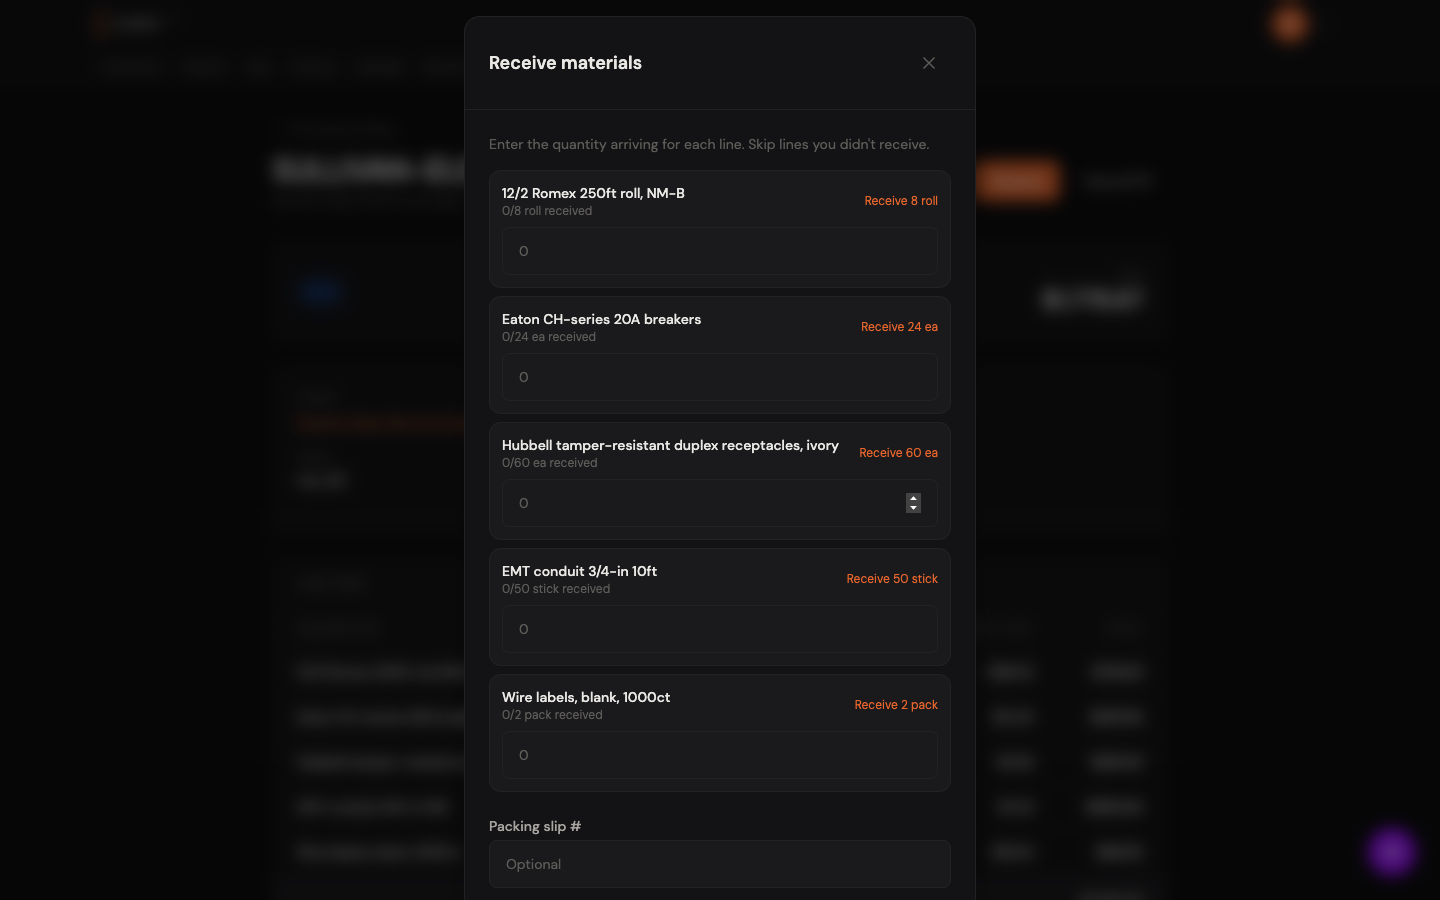
When materials arrive, open the PO and click Receive. The Receive materials modal opens with one row per PO line item. Type the quantity that arrived, or click the per-line “Receive N [unit]” link to fill the remainder.
- Receive materials title. Modal heading. Sub-text reminds you to skip lines you didn’t receive.
- Receive [N] [unit] link. Per-line one-click fill. “Receive 8 roll” on the Romex line auto-fills the input with 8.
- Quantity input per line. Type the quantity if you want to override the one-click fill (partial deliveries).
- N of N already received. Sub-text under each line title, such as “0/8 roll received.” Running tally that updates as you receive across multiple deliveries.
- Receive [N] [unit] on a different line. Same one-click pattern, such as “Receive 24 ea” on the breakers line. Each line tracks its own unit (roll, ea, stick, pack) and remainder.
- Packing slip #. Optional field at the bottom. Recommended for record-keeping when the supplier provides one.
Partial receiving works. Record what physically arrived; receive the rest later. PO status flips to Partially Received until everything’s in, then Fully Received. Notes (damaged items, discrepancies) live below the packing slip field.
- 1. Receive materials
- 2. Receive 8 roll (one-click fill)
- 3. Quantity input per line
- 4. N of N already received
- 5. Receive 24 ea (different unit, different line)
- 6. Packing slip number (optional)
06Bills and three-way match
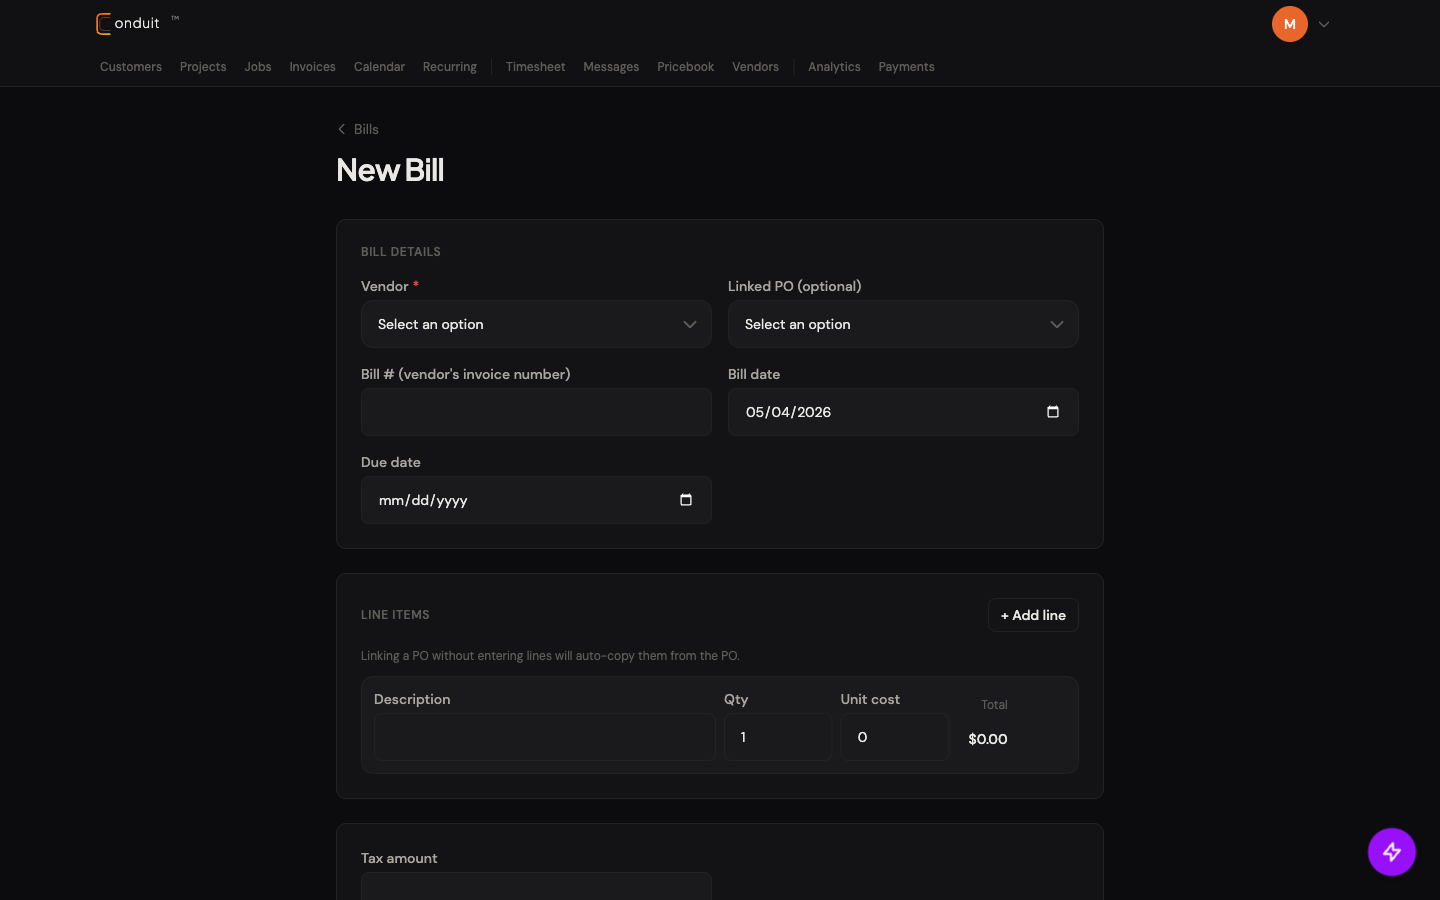
When the vendor sends their invoice, create a Bill in Conduit. From the PO detail (or the Bills page), click + New Bill to land on the New Bill form.
- Vendor. Required. Pick the vendor whose invoice this is.
- Linked PO (optional). This is what enables three-way match. Pick the PO this bill covers; Conduit will compare bill total against PO total and received quantities.
- Bill #. Vendor’s invoice number from their actual paper/PDF invoice. Use this for reconciling.
- Bill date. Date on the vendor’s invoice.
- Due date. When payment is due, based on the vendor’s terms.
- + Add line. Manually add a line item if you skipped the Linked PO step or need to add a freight/adjustment line.
- Auto-copy hint. “Linking a PO without entering lines will auto-copy them from the PO.” Pick the PO and skip line entry; Conduit fills the lines for you.
- 1. Vendor
- 2. Linked PO (enables three-way match)
- 3. Bill # (vendor's invoice number)
- 4. Bill date
- 5. Due date
- 6. + Add line
- 7. Auto-copy hint (link the PO, skip line entry)
How three-way match works
Once the bill saves, Conduit compares three numbers automatically:
- PO total (what you committed to)
- Received quantities × unit cost (what actually arrived)
- Bill total (what the vendor charged)
A variance message appears on the bill: “Match clean,” “Over PO by $50,” “Under PO by $25.” The advisory is not blocking. Real-world purchasing has too many legitimate variances (price changes, freight, partial deliveries, returns) to hard-block. The flag is there so you review before paying.
07Committed cost on projects
Back on the project Overview tab (any project linked to your POs), the Committed Cost card shows the total across all POs in Sent, Acknowledged, Partially Received, or Fully Received status.
- Real-time updates as POs move through their lifecycle.
- Even before bills come in, committed cost shows what you’ve committed to spend.
- Feeds project P&L. See Analytics & P&L.
This is your forward-looking spend number, distinct from “actual paid” (which comes from bills). Good for budget tracking on long-running projects.
That’s the full purchase order lifecycle. Next: Analytics and P&L for the numbers behind your business.