If you’re a general contractor working with sub-contractors, Conduit handles the whole bid request and collaboration flow. You invite subs, they submit bids, you compare and accept, and from there you’re working together inside the same project. The piece that makes this possible is mirror projects, shared project structure across companies.
01Create a sub-bid request
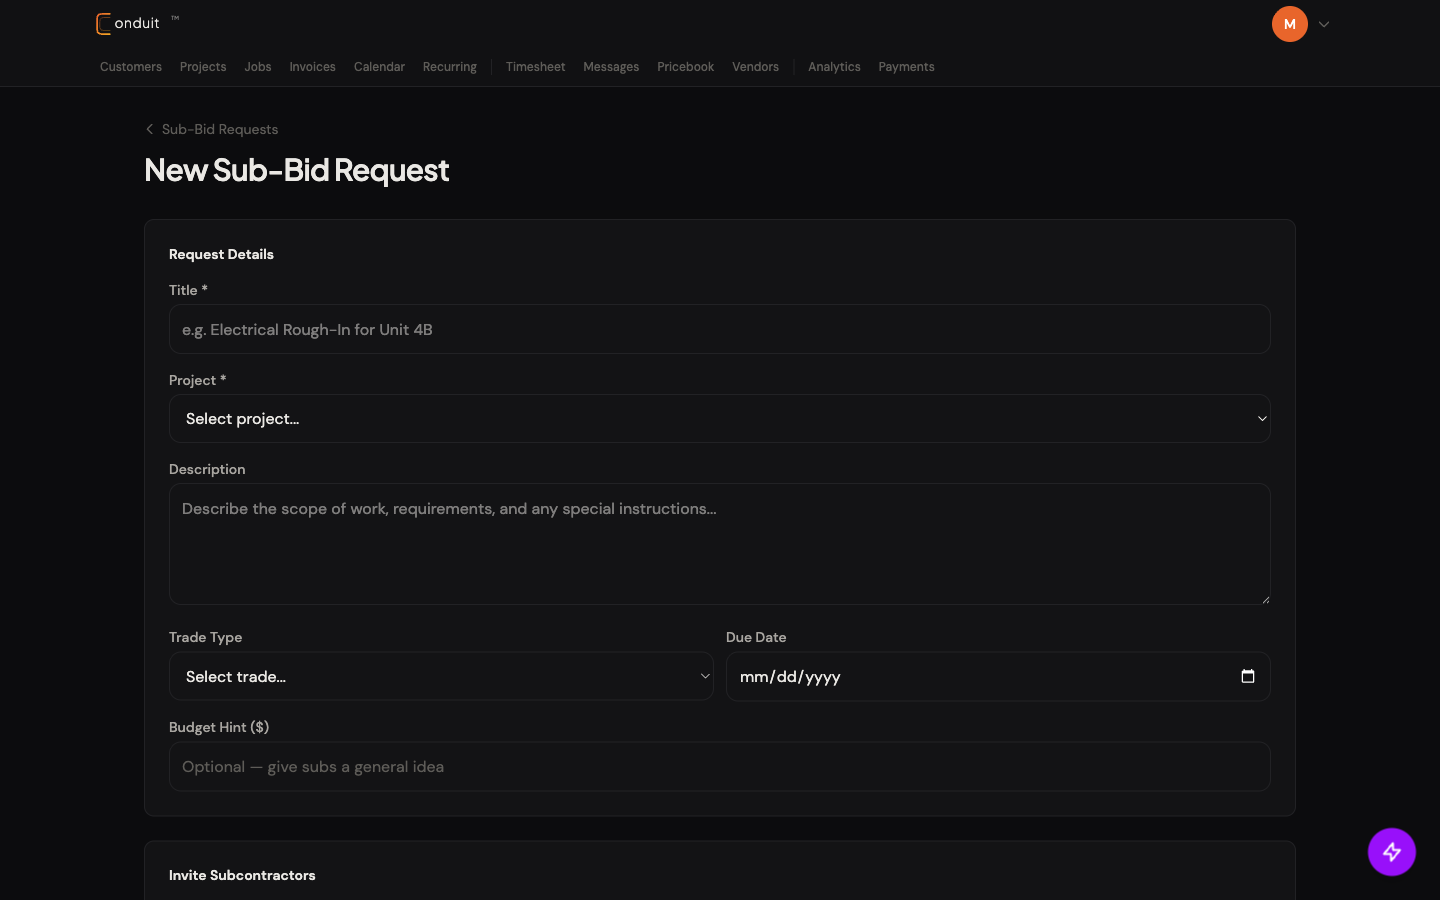
From a project’s Sub-Bid Requests tab, click + New Request. You can also start from the project Bids tab by clicking Invite Contractors, which opens the same request flow.
- Title. Descriptive: “Electrical Rough-In for Unit 4B,” “Plumbing rough-in,” etc.
- Project. Required. Picks the project this scope belongs to.
- Description / scope. What you need bid. Line-item-level detail helps subs price accurately.
- Trade Type. Electrical, Plumbing, HVAC, Mechanical, GC, etc. Drives which subs get suggested in the invite step.
- Due Date. When you need responses back by.
- Budget Hint ($). Optional. Helps subs gauge the ballpark; not a hard limit and not shown to them as authoritative.
- Invite Subcontractors. Section continues below the form fields. That’s where you add emails to invite (covered in tab 02).
- 1. Title
- 2. Project
- 3. Description / scope
- 4. Trade Type
- 5. Due Date
- 6. Budget Hint (optional)
- 7. Invite Subcontractors (continues below)
Documents (plans, specs, anything subs need to price accurately) attach below the Invite Subcontractors block.
02Invite subs
In the request detail, scroll to the Invitations section.
- Email. Add one contractor email at a time.
- Company name. Optional, but useful when the email alone is not obvious.
- Add invite. Adds the contractor to the request. You can remove an invite before they respond.
- Send request. Sends the request to every invite once the scope and invite list are ready.
If the email matches a Conduit company, the invite links to that company. Otherwise, the contractor gets an email link to sign up and respond.
03The sub’s experience
When a sub accepts the invitation, this is what they see (helpful context for understanding the GC side).
- Incoming Bid Requests card on their dashboard.
- Open the request to see scope, due date, budget hint, and all attached documents.
- Build their bid. Title, description, line items with pricing, proposed start/duration, deposit terms.
- Save draft or submit immediately.
The sub can ask questions through the bid’s comment thread before submitting; the GC sees those.
04Compare submitted bids
Back on the GC side, open the request from the project Bids tab. Once bids come in, click Compare Bids on the request detail. Every submitted bid becomes a column laid out apples-to-apples.
- Trade + SBR number. Header tells you which request you’re comparing on (e.g., “Plumbing, Hartford Medical Office, SBR-2026-0004”).
- Sub name + bid number. Each column starts with who submitted it and their internal bid number for traceability.
- Status badge. Per-bid status: Pending review, Accepted, or Declined. Cheapest bid also gets a “Lowest” badge automatically when you have more than one.
- TOTAL. Big number at the top of each column, with Subtotal + Tax broken out underneath.
- LINE ITEMS. Full breakdown for that bid. Compare scope across columns line by line.
- SCHEDULE. Proposed Start, Duration, and Valid Until, the timing dimension you can’t get from price alone.
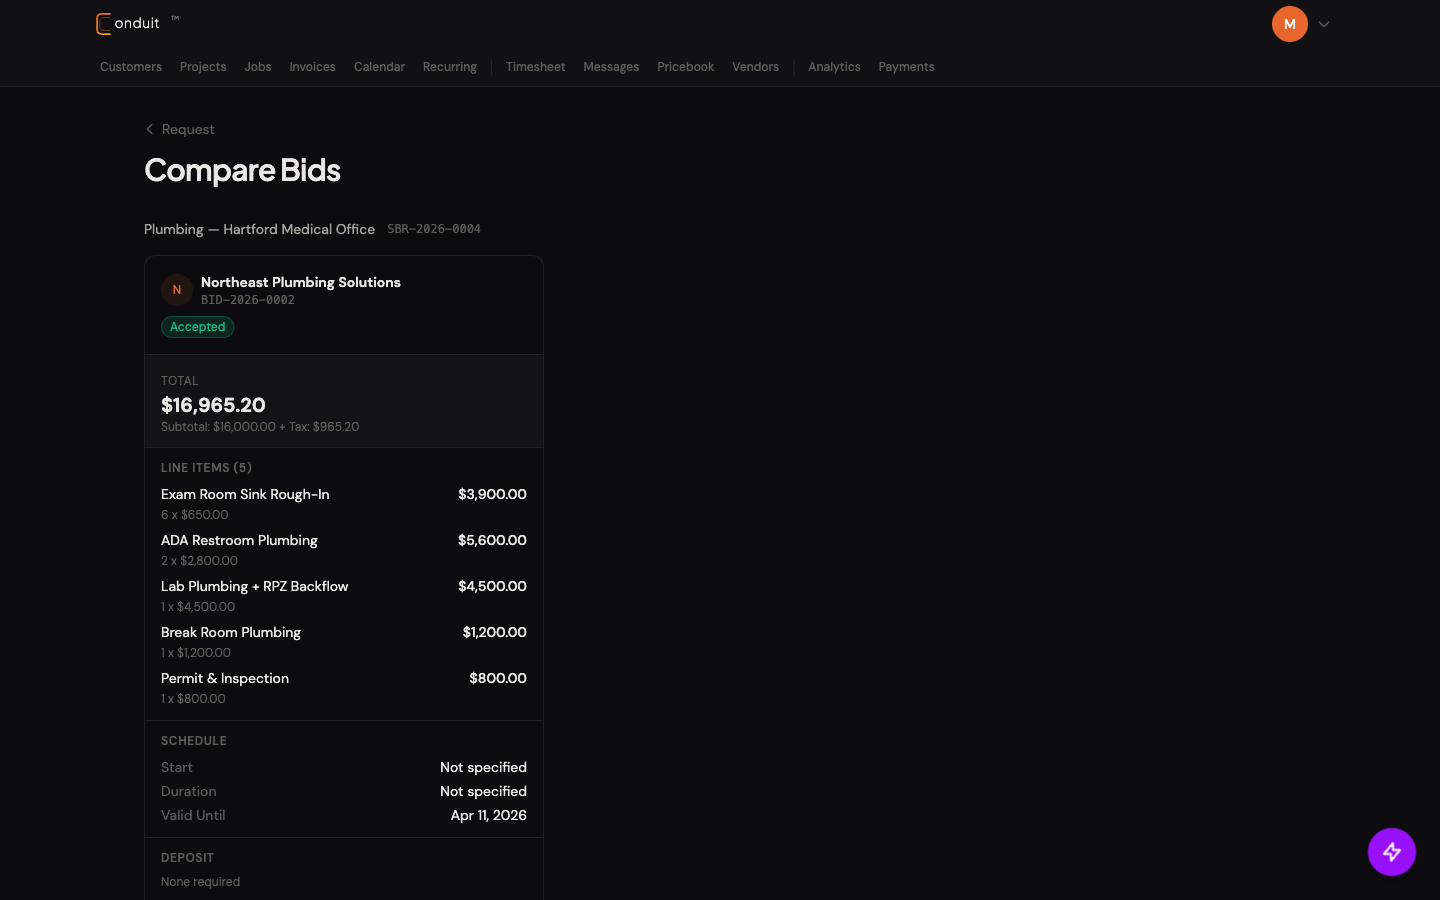
- 1. Trade and SBR number
- 2. Sub name and bid number
- 3. Status badge
- 4. Total at top of column
- 5. Line items breakdown
- 6. Schedule (Start / Duration / Valid Until)
Cheapest isn’t always best. A bid that’s $500 cheaper but with a 3-week delay can cost you more than the savings. Read the schedule and line items together, not just the total.
05Accept and create a mirror project
Click Accept on the winning bid. Four things happen automatically: a mirror project is created in the accepted sub’s account, the sub gets a notification confirming acceptance, the other submitted bids auto-decline with a “GC accepted another bid” reason, and the sub can immediately start working inside the shared project structure.
The screenshot below shows the mirror as the sub sees it. They get the same project skeleton you have, but their tab counts reflect only their own work.
- Project name + address. Synced from the GC’s source project. Updates flow one-way (GC to sub).
- Active status chip. Mirrors the GC’s status. When the GC moves the source to Completed, the mirror moves too.
- Same tab bar. Plans, Bids, Jobs, Invoices, POs, Bills, RFIs, Submittals & Specs, Change Orders, Timesheet, Schedule. The count chips reflect only the sub’s own items.
- Profit & Loss card. Sub’s own P&L for this engagement, their invoices vs their costs, not the GC’s.
- Committed Cost. The sub’s POs against this project (subcontractor commitments visible from the sub’s perspective).
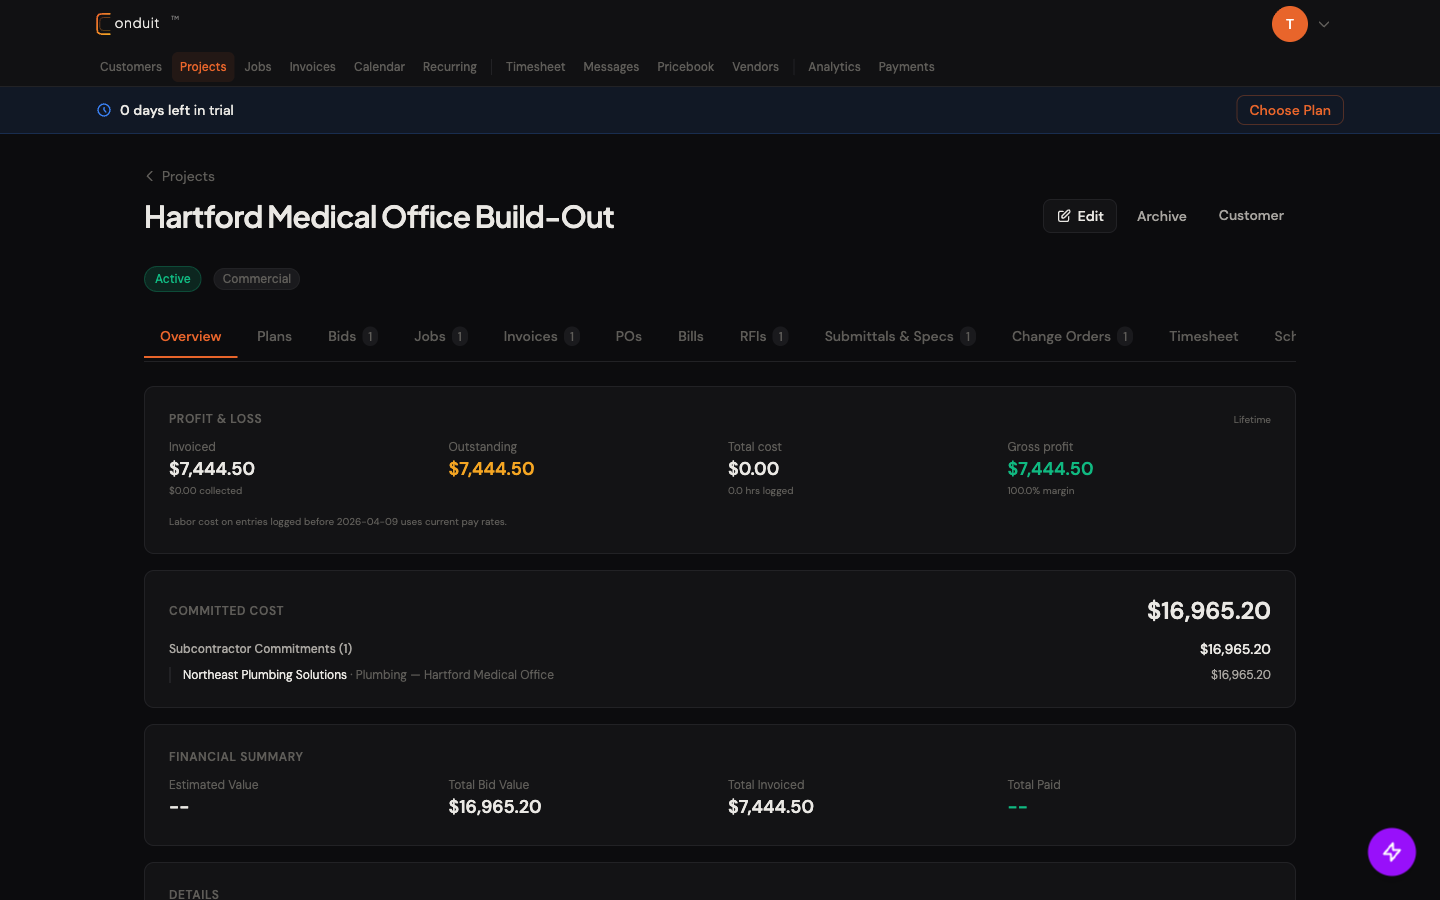
- 1. Project name + address synced from GC
- 2. Active status mirrors GC
- 3. Same tab bar, counts are sub-only
- 4. Sub's own P&L (their invoices vs their costs)
- 5. Committed Cost from sub's POs
06Cross-company visibility
This is where the GC’s superpower kicks in. From your project’s RFIs, Submittals, Change Orders, and Invoices tabs, you see items from all your subs aggregated into one list.
- One unified view per resource type. All RFIs from electrical sub, plumbing sub, HVAC sub appear together.
- Company name labels on each item show which sub it’s from.
- Sort + filter by sub if you want to focus on one trade at a time.
- Subs only see their own items. Their data stays private to them; you see the aggregated view because you’re the GC source project.
This eliminates the GC’s “switching between sub accounts to see the project” problem. It’s all in one place.
That’s the sub-bid + mirror project workflow. Next: RFIs for the question-and-answer flow.