This is the single most important transaction in Conduit. Customer + job + work + invoice + payment. Once your customers and pricebook are in (see Adding Customers and Building Your Pricebook), this is the loop you’ll run every day.
Conduit handles two flows on the same form: a toggle at the top switches between Schedule for Future (booking work that hasn’t happened yet) and Log Completed Work (catching up on work you’ve already done).
01Create a job
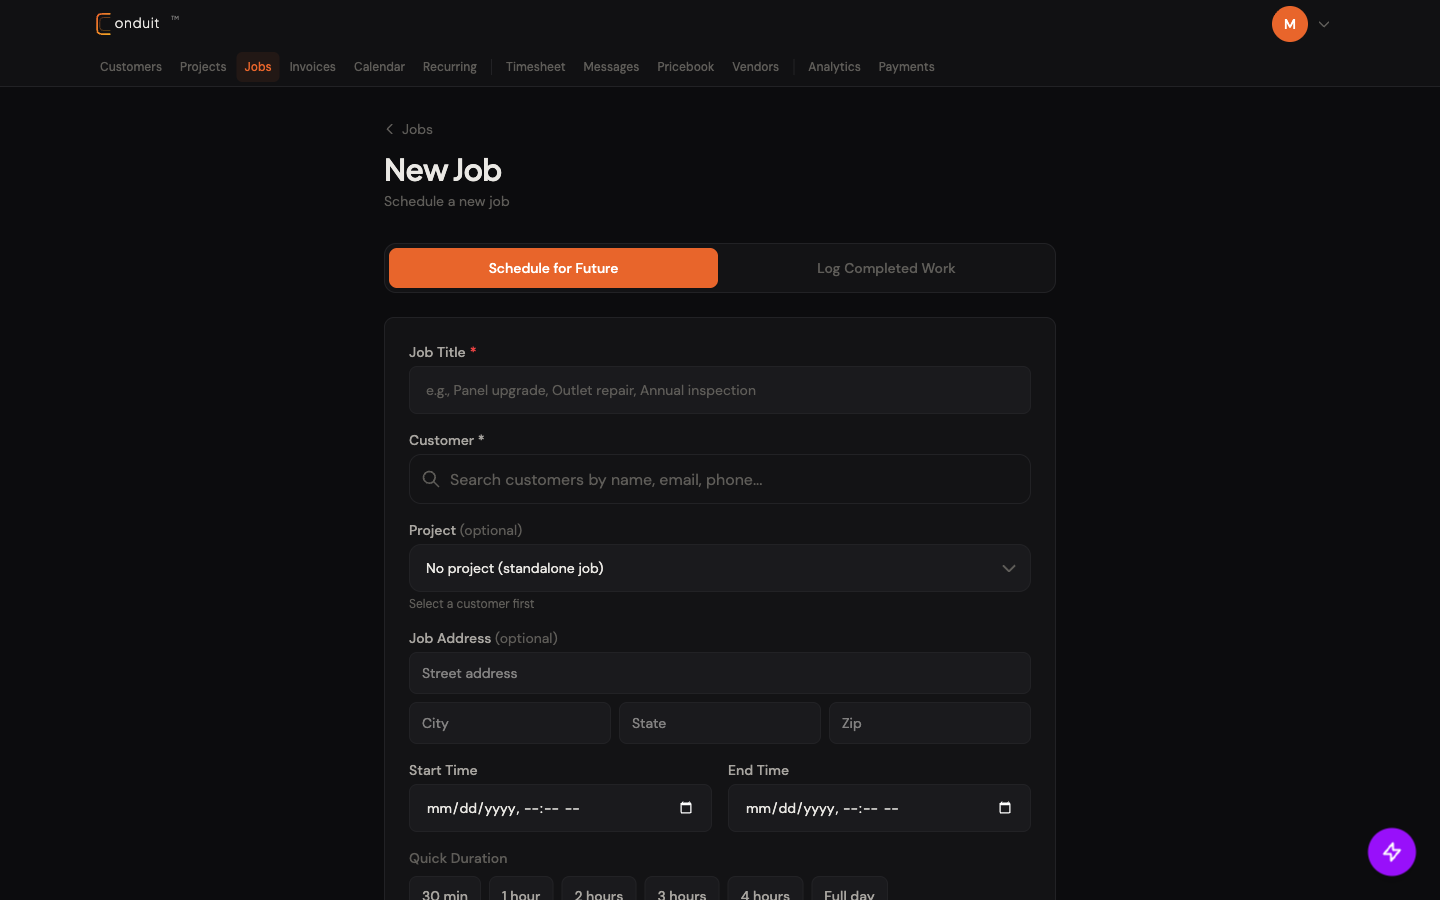
Click + New Job from the top nav, the dashboard, or the customer detail page. The form opens in Schedule for Future mode by default. The toggle at the top of the form switches between the two modes; the rest of the fields adapt to whichever you pick.
Schedule for future work
The form is split top-to-bottom: the required fields are visible by default, the optional ones live behind a More options disclosure.
- Mode toggle. Leave it on Schedule for Future.
- Job Title. What this job is. (“Service call: kitchen outlet replacement.”)
- Customer. Search by name, email, or phone. Required.
- Project. Pick an existing project, or leave as standalone. Required if you select a customer with active projects.
- Job address. Pre-fills from the customer record; override for one-off locations.
- Start and End Time. When the work is scheduled. The Quick Duration chips (30 min, 1 hour, 2 hours, 3 hours, 4 hours, Full day) auto-fill End Time once you pick a Start.
- 1. Schedule / Log toggle
- 2. Job Title
- 3. Customer search
- 4. Project picker
- 5. Job Address
- 6. Start and End Time
- More options (optional). Click to expand. Reveals Job Type, Priority, How will you charge (Flat Rate / Hourly / Time + Materials), Assigned technician, Estimated Total, Description, and Internal Notes. The defaults work for most jobs; expand if you need to override the assignee or set pricing details.
- Create Job.
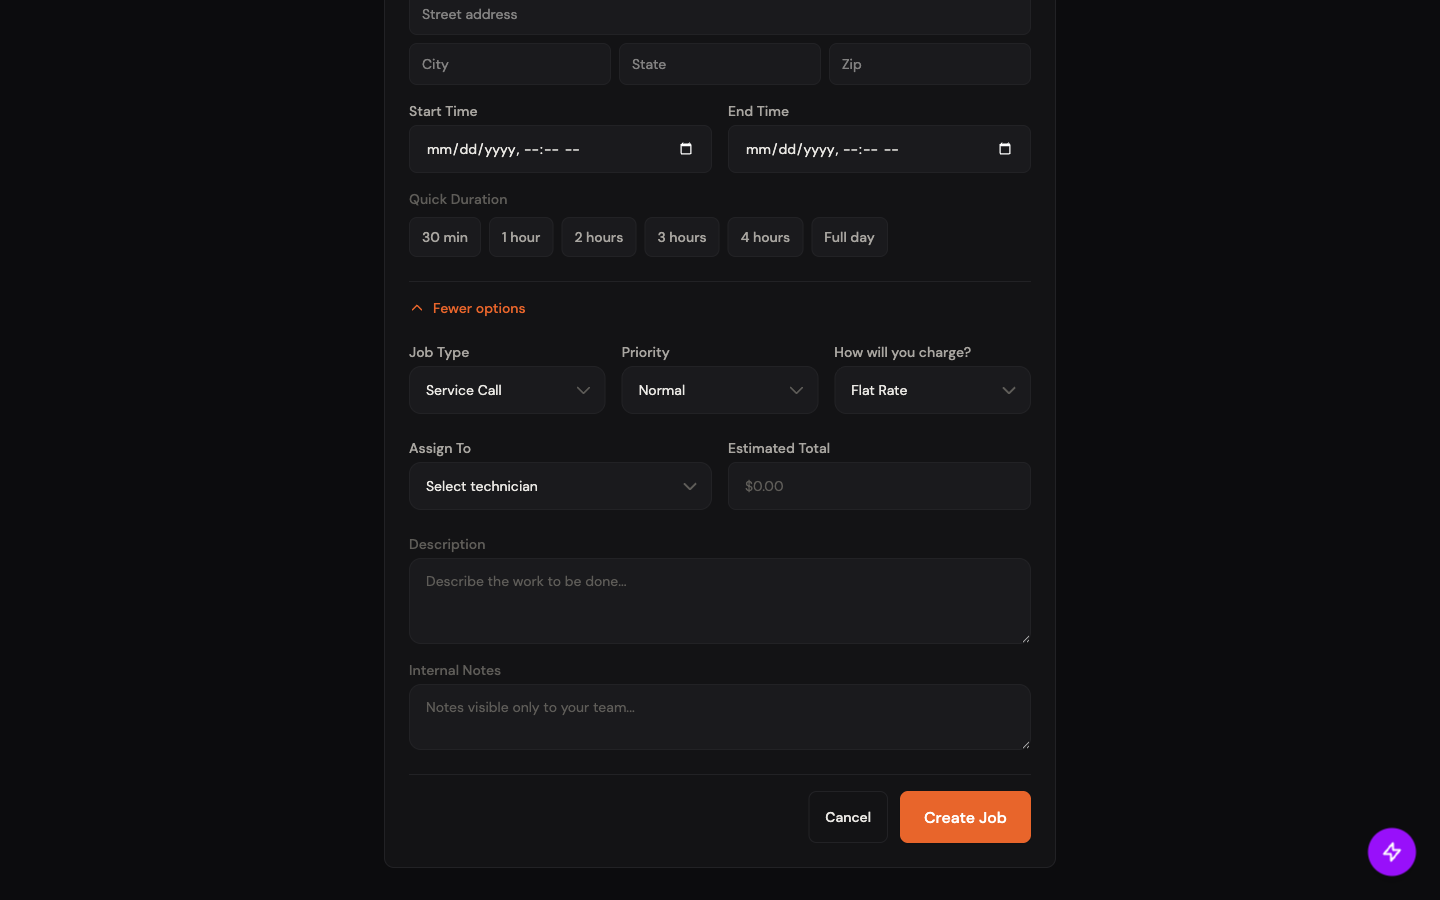
- 7. Assign To
- 8. Create Job
The job lands on the Calendar and on the assigned technician’s dashboard.
Log work that already happened
Same form. Flip the toggle from Schedule for Future to Log Completed Work. The Start/End time row is replaced with a Days Worked grid; everything else stays the same.
- Mode toggle. Switch to Log Completed Work.
- Customer + Project + Title + Tech. Same as Schedule mode.
- Days Worked. Each row is one date plus the hours worked that day.
- + Add Another Day for multi-day jobs. (“Yesterday, 6 hours. Day before, 4 hours.”)
- Save.
Conduit creates the job with all your time entries already in place and marks it Completed, ready to invoice.
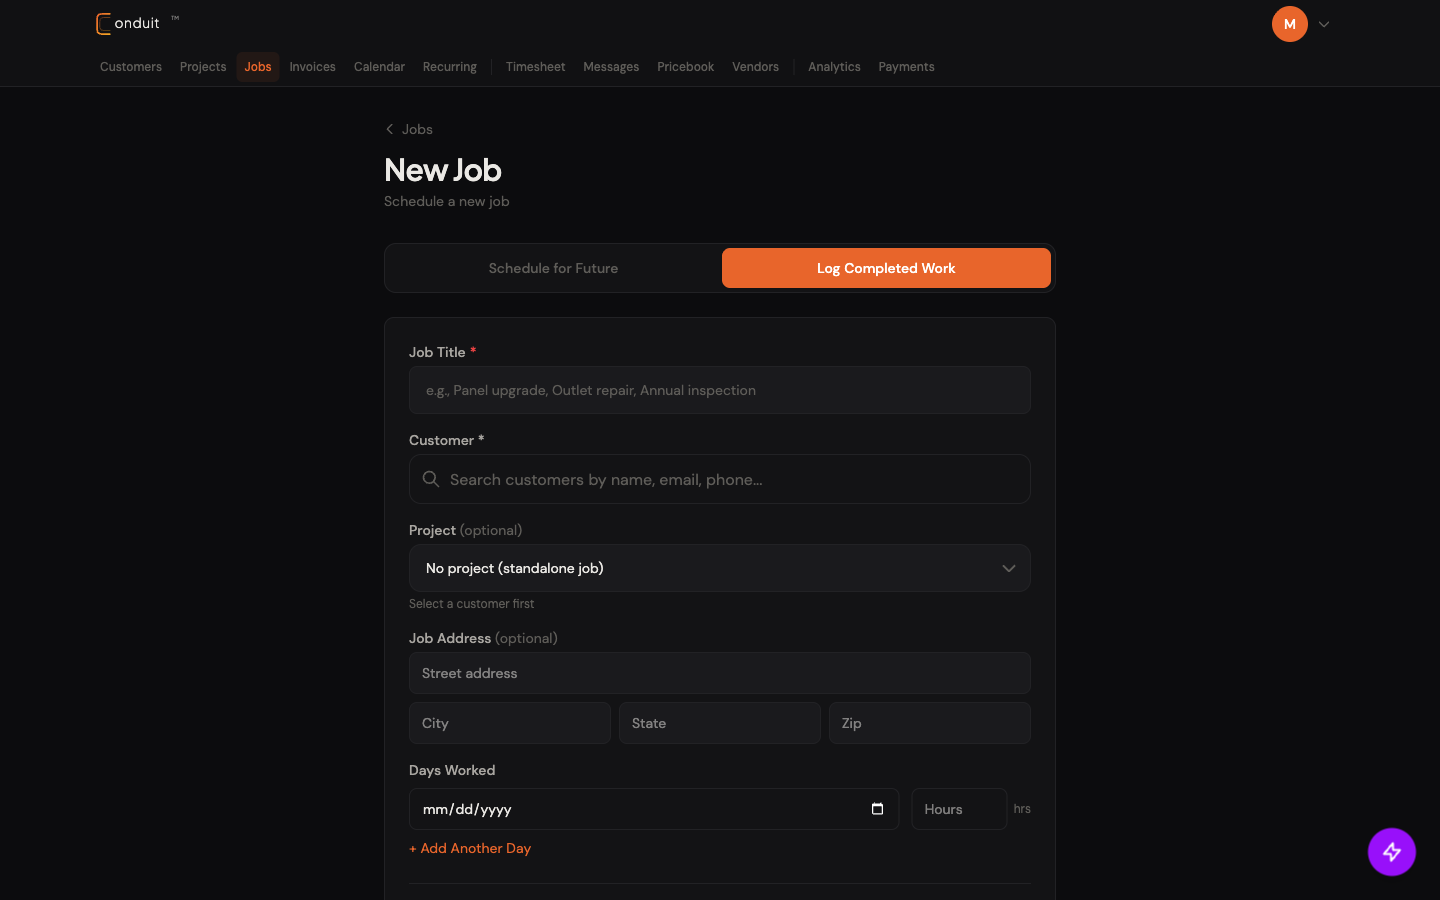
- 1. Toggle now in Log mode
- 2. Days Worked: date + hours
- 3. + Add Another Day for multi-day jobs
02Job lifecycle
The job detail page
The job detail page is the working surface for a single job. Everything you do to a job (clock in, log time, change status, mark complete, edit, archive) happens here.
- Status chip. The job’s current state, color-coded.
- JOB number + priority chip. Auto-generated number; priority defaults to Normal.
- Edit / Archive. Top-right actions for changes and end-of-life.
- Clock In / Clock Out. Live timer for the assigned technician. Time entries auto-create on clock-out.
- Time Worked. History of every entry against this job.
- + Add time entry. Manual entry for entries you didn’t clock-in for.
- Log Hours Worked. Quick same-day entry without leaving this page.
- Hold / Complete / Cancel. Status action buttons.

- 1. Status chip
- 2. JOB number + priority
- 3. Edit / Archive
- 4. Clock In / Clock Out (live timer)
- 5. Time Worked log
- 6. + Add time entry
- 7. Log Hours Worked (quick same-day entry)
- 8. Hold / Complete / Cancel
Scroll past the action buttons and you’ll see the context cards.
- Schedule + Customer cards. Scheduled start/end, duration, actual start, estimated total on the left; customer name, phone, email on the right. Below that, the Project card surfaces the address and access info (gate codes, lockbox notes) so the technician has everything they need on site.
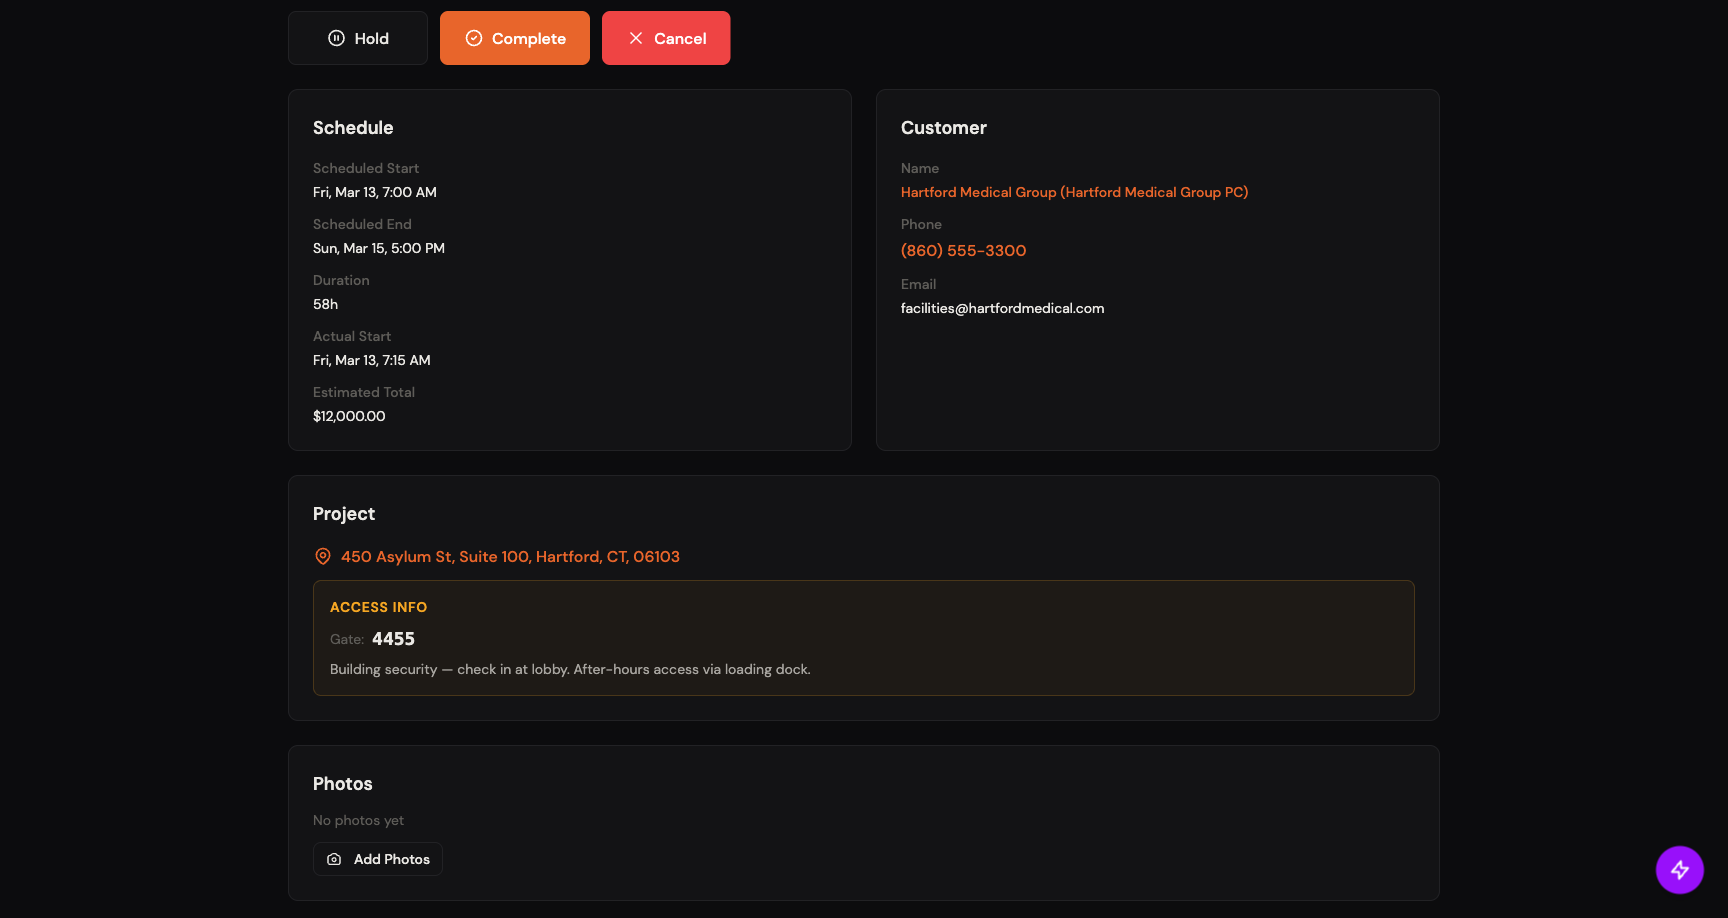
- 9. Schedule card (Scheduled Start, End, Duration, Actual Start, Estimated Total)
- 9. Customer card (Name, Phone, Email)
The five status states
Every job moves through the same lifecycle. The status chip shows the current state; the kanban (Pipeline) view groups all jobs by state at a glance.
- Scheduled. It’s on the books.
- Confirmed. The customer has confirmed they’ll be there.
- En Route. The technician has left for the site.
- In Progress. The technician is on site working.
- Completed. The work is done.
There’s also On Hold (paused) and Cancelled / No Show as off-path terminal states.
The moment you mark a job Completed, Conduit pops a banner asking what’s next. 99% of the time the answer is: invoice the customer. The banner has a one-click Create Invoice button.
Pipeline view
The Jobs page has two layouts: a flat list (default) and a kanban-style Pipeline view that groups every job by lifecycle state at a glance.
- List / Pipeline toggle in the top right of the Jobs page. Clicking the right icon switches into the kanban view shown below.
- + New Job stays available from either layout.
- One column per status. The chip on the column header shows the live count.
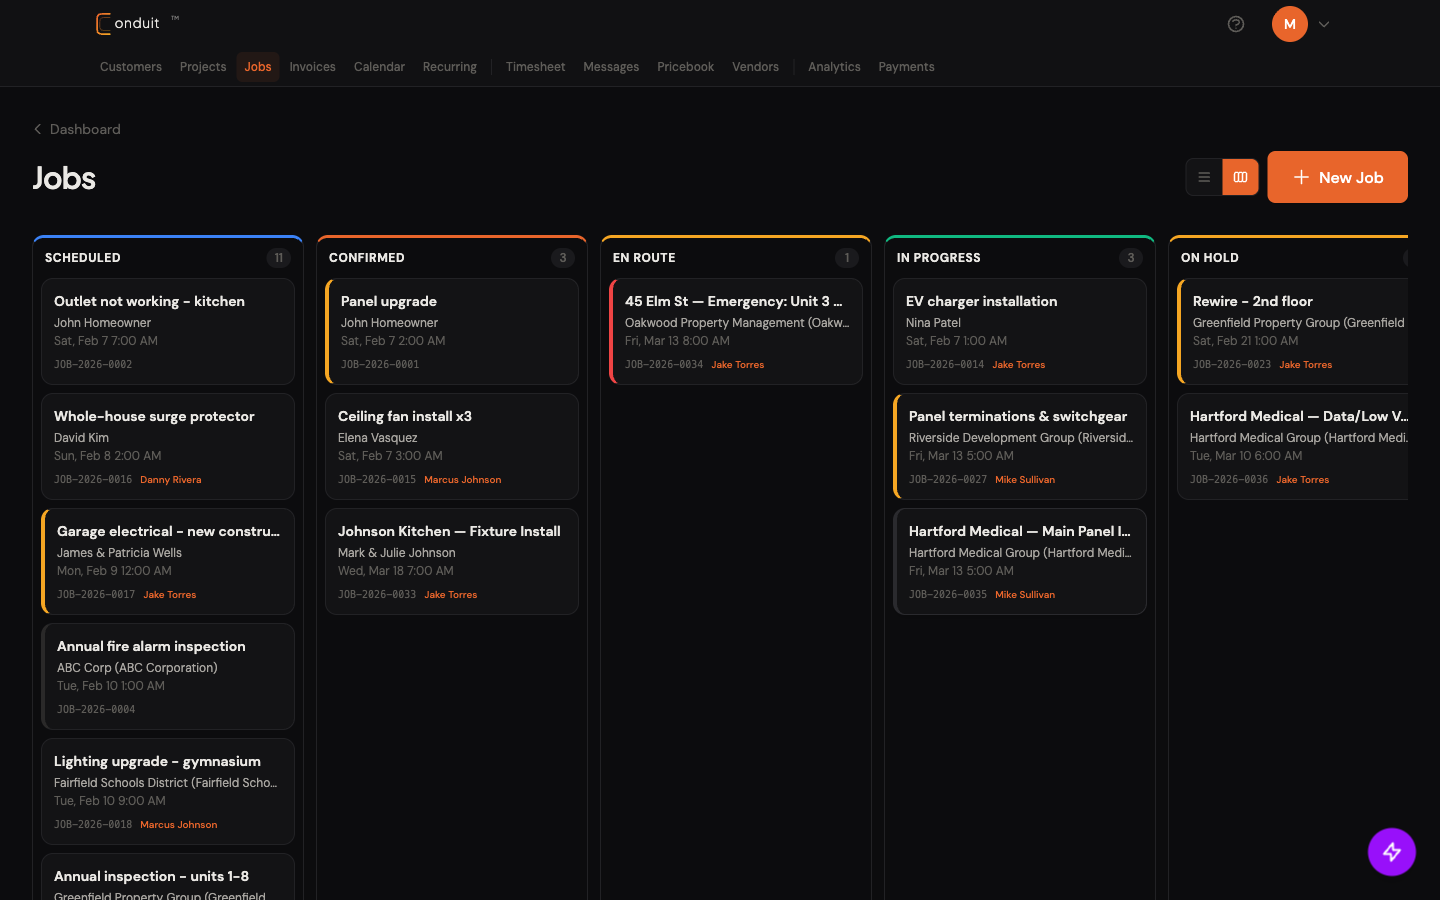
- 1. List / Pipeline toggle
- 2. + New Job
- 3. One column per status
- Card anatomy. Each card surfaces what you need to triage at a glance: job title, customer, scheduled time, JOB number, and (when assigned) the technician in orange.

- 4. Job title
- 2. Customer
- 3. Scheduled time
- 4. JOB number
- 5. Assignee (orange when set)
- Drag a card between columns to update its status. While dragging, the source card dims in place and a lifted overlay follows the cursor so you can confirm you’re dropping in the right column. (If dragging isn’t your thing, use the Hold / Complete / Cancel buttons on the job detail page above.)

- 5. Source card dims while held
- 5. Lifted overlay follows the cursor
03Create the invoice
A job that’s ready to invoice
A job becomes “ready to invoice” the moment you mark it Completed. Conduit knows the work is done, knows who did it, knows the hours and materials, and offers you the action right at the top of the page.
- Completed status chip. The job’s lifecycle has hit its happy-path terminal state.
- “Job complete!” prompt banner. Inline reminder that pops the moment you mark Completed; sticks at the top of the job detail page until you act on it.
- Create Invoice button. One click opens the new invoice form pre-filled from this job.
- Time entries below. The hours that will turn into the labor line on the invoice. (Materials show separately if logged via job expenses.)
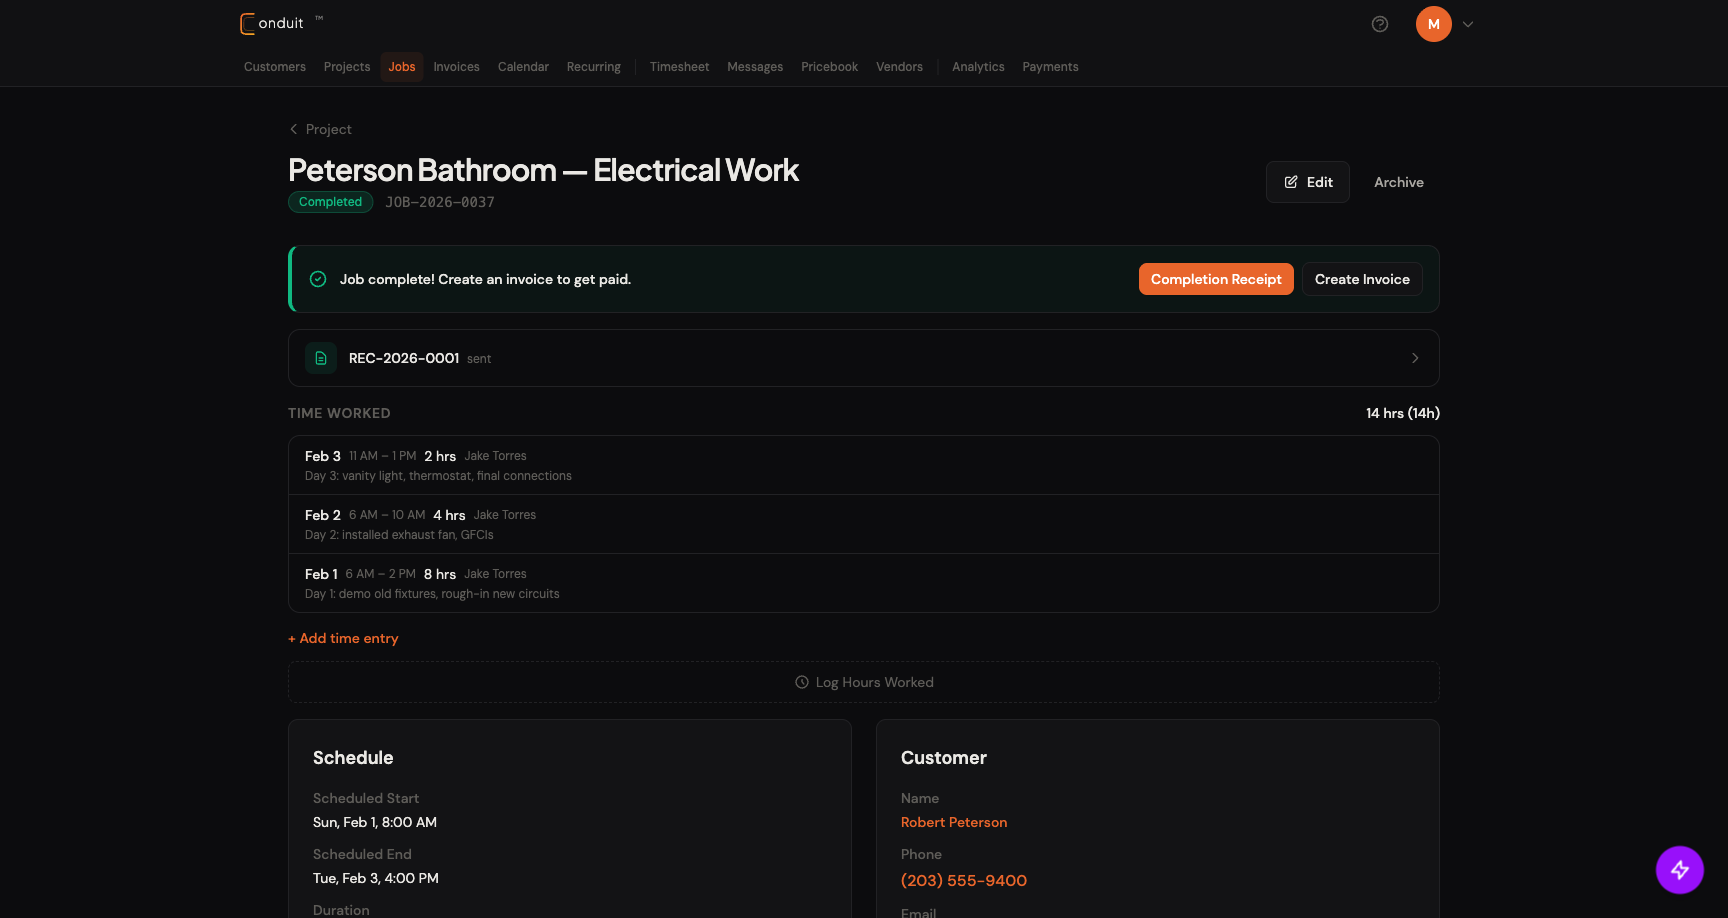
- 1. Completed status chip
- 2. 'Job complete!' prompt banner
- 3. Create Invoice button (one click → next screen)
- 4. Time entries (will become the labor line)
The new invoice form
Click Create Invoice and Conduit opens a pre-filled new invoice form. Customer, job name, line items, and dates are already populated; you adjust as needed.
- Customer + Job Name. Pre-filled from the job. Customer is locked from the picker, Job Name is editable.
- Issue Date / Due Date. Issue defaults to today; Due defaults to 30 days out (configurable per-invoice).
- Items & Pricing. Section that holds the line items, tax, and discount. Line items pulled from the job’s labor + materials (see close-ups below).
- Notes & Terms. Customer-facing notes + internal notes (further down the form).
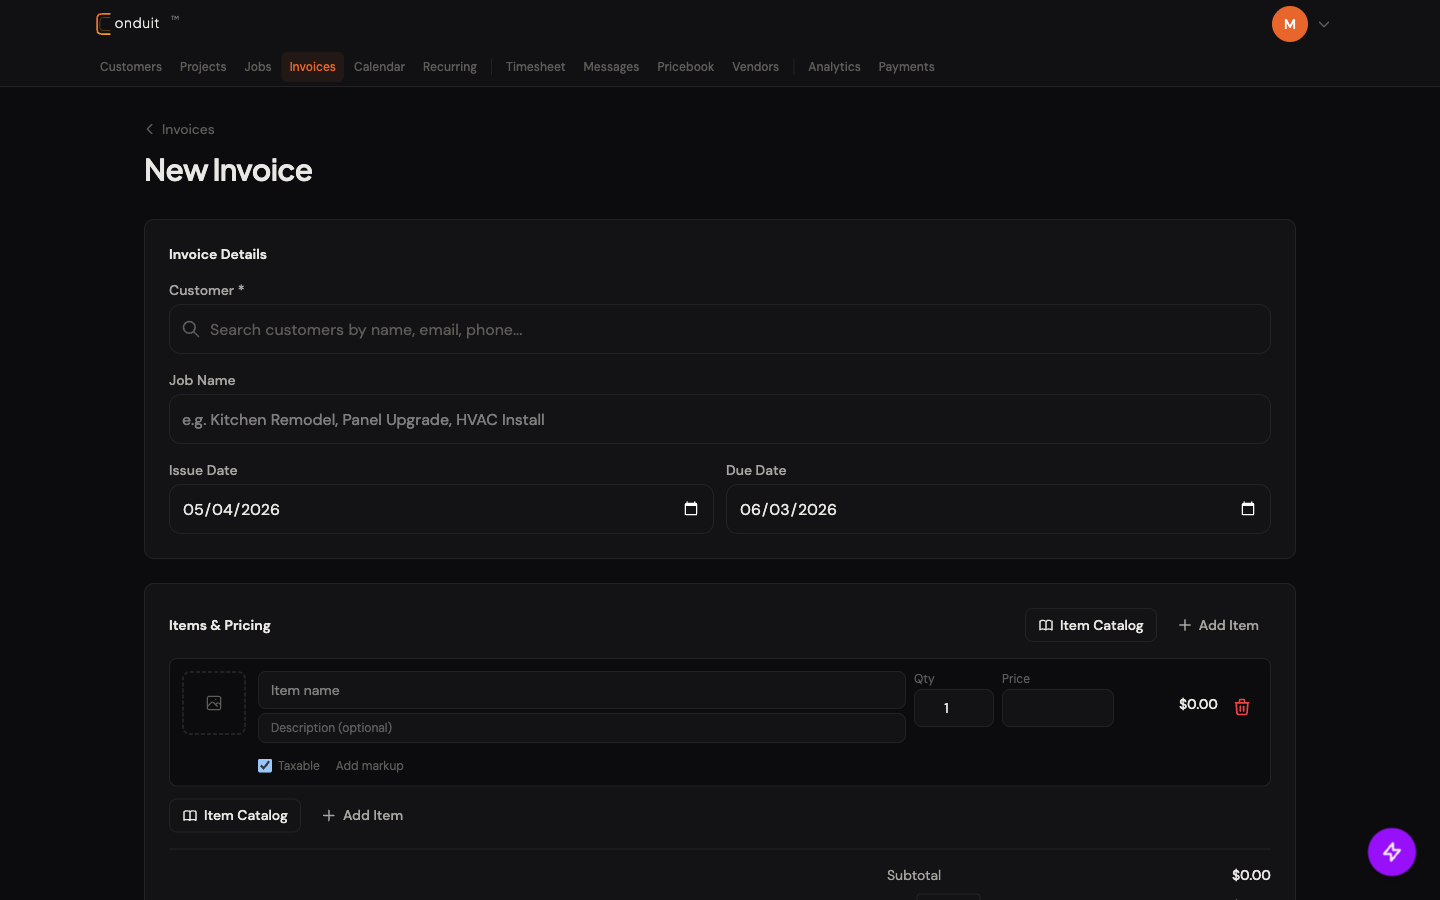
- 1. Customer + Job Name (pre-filled, customer locked)
- 2. Issue Date / Due Date
- 3. Items & Pricing (line items + tax + discount, see below)
- 4. Notes & Terms (customer-facing + internal, further down)
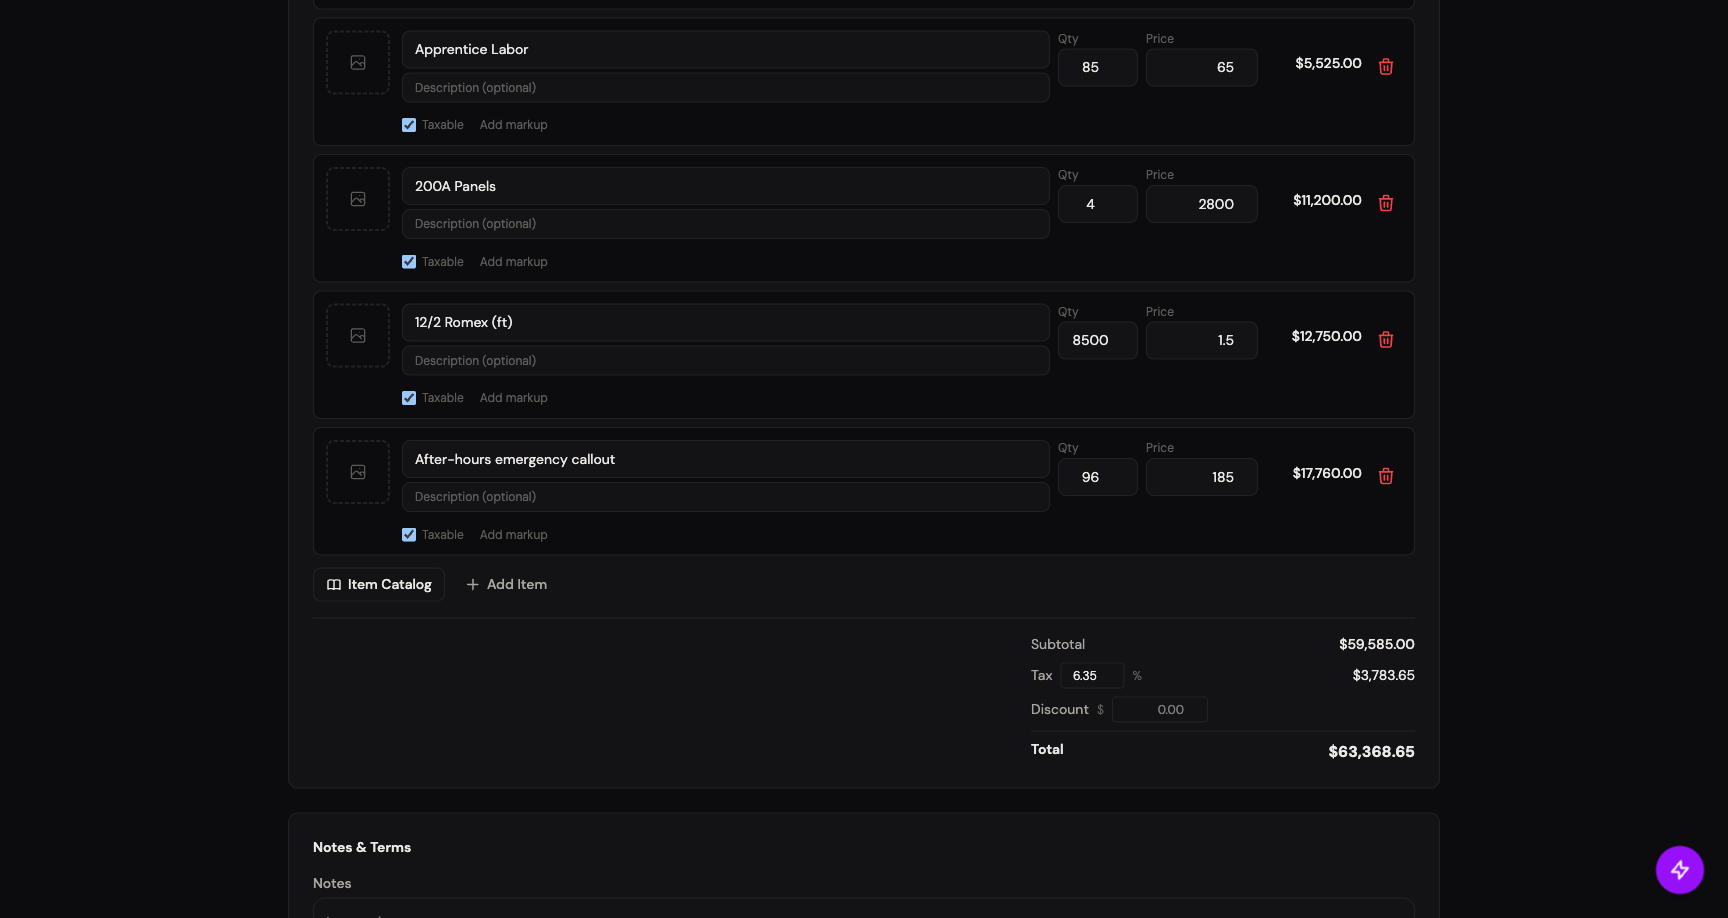
Adding line items from your pricebook
Click Item Catalog to expand the pricebook drawer above the line-items list. Items are grouped by category (EV Chargers, Fixtures, etc.) with a search bar at the top. Click any item and it drops in as a new line with name, price, and unit pre-filled.
- Search bar. Type to filter across all pricebook items.
- Categories. Items grouped by section so you can scan visually.
- Item rows. Click any row to add it to the invoice. Cost is shown for your reference (internal, never on the customer-facing PDF).
- Close Catalog when you’re done adding from pricebook.
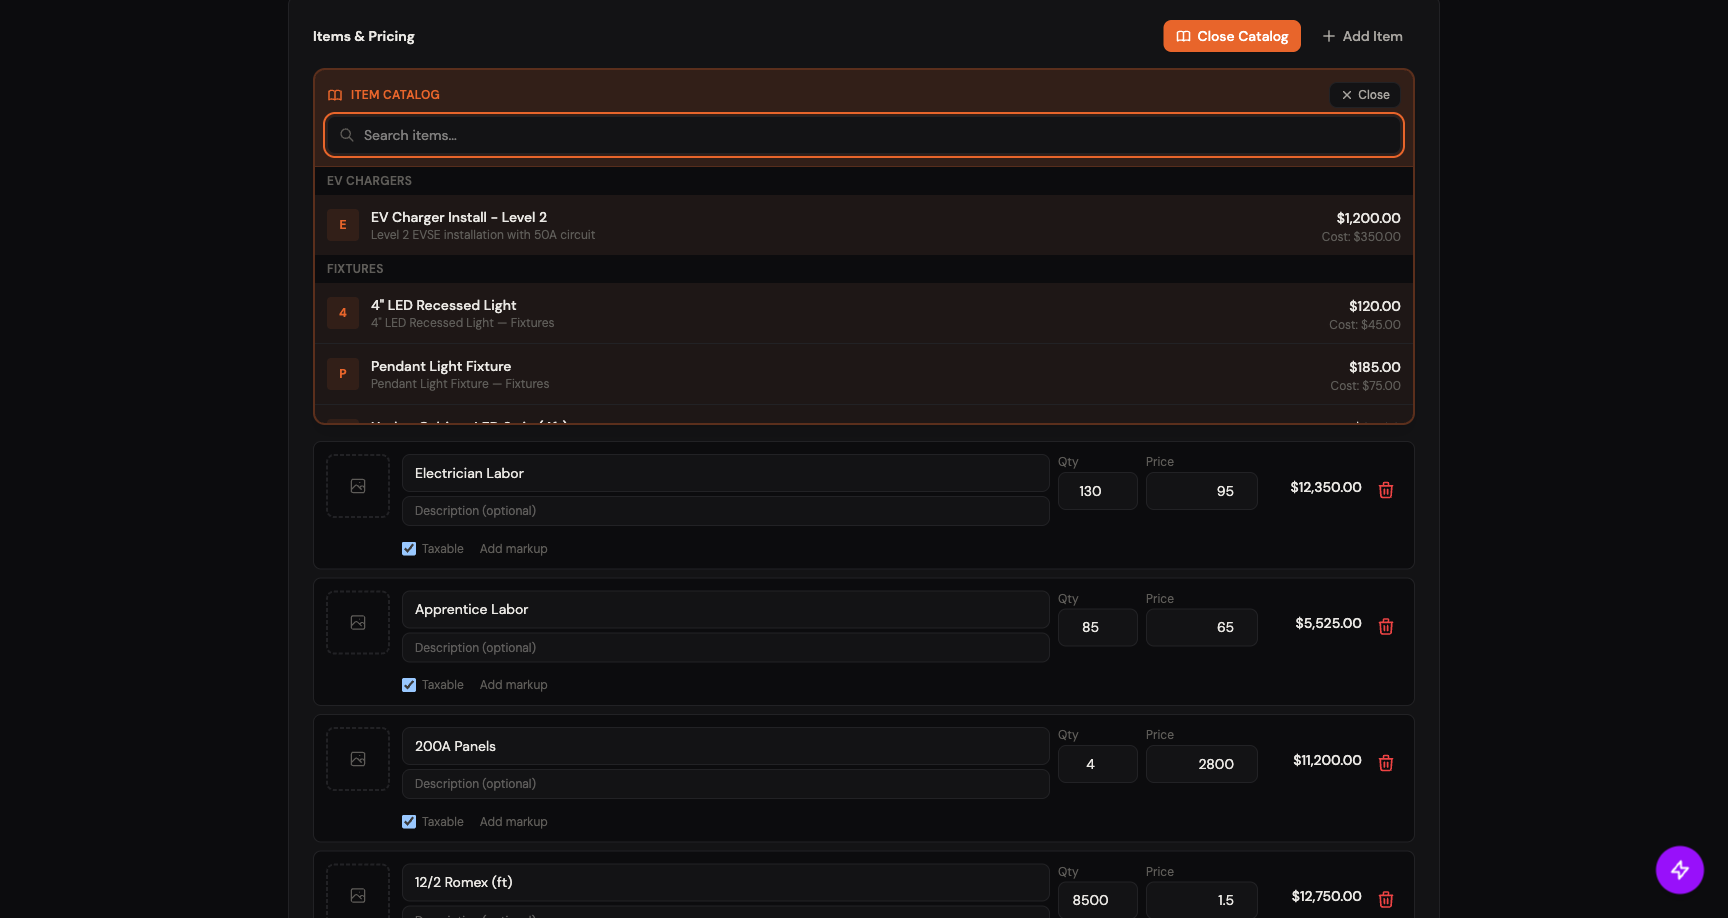
- 1. Search bar
- 2. Categories
- 3. Item rows — click to add
- 4. Close Catalog
Adding a custom line item
For one-off items not in your pricebook (after-hours surcharge, special-order parts, custom fabrication), click + Add Item to drop in a blank line and type directly.
- Item name — required. Free-text, no restriction.
- Description (optional) — second line for clarification.
- Qty + Price — manually enter both; line total calculates automatically.
- Taxable toggle — defaults to true; uncheck for non-taxable items (labor, in some states).
- Add markup — opens Cost + Markup % columns if you want to track margin internally on this line. (Detailed in Invoicing and Payments deep dive → Margin tracking.)
- Add to your pricebook from this line if it’s something you’ll bill again.
- 1. Item name (free text)
- 2. Description (optional second line)
- 3. Qty + Price (manual entry)
- 4. Taxable toggle + Add markup link
- 5. + Add Item (drops in another blank)
- 6. Subtotal / Tax / Discount / Total — live
Tax, discount, and save
Below the line items, three knobs and a button finish the form:
- Tax is calculated automatically on items marked taxable, at the company default rate (override per-invoice in the Tax field).
- Discount is an optional flat dollar amount applied to the subtotal.
- Due Date defaults to 30 days from issue (set above; revisit if you want a different term).
- Save lands the invoice in Draft status, ready to send.
04Send it
The invoice detail page is the send hub. SMS, email, status badges, payment recording, and the past-due reminder all live here on one screen.
- Send via Text. SMS to the customer’s phone with a link to your branded payment portal.
- Send via Email. Same link, plus the PDF attached.
- Send All. Fires both channels in one click — fastest path to “out the door.”
- PDF download. Top-right link grabs the PDF you can attach to a separate email or print.
- Status badges + Send Reminder. Once sent, status flips to Sent. If it goes past due, an Overdue badge appears and a Send Reminder button surfaces in the past-due banner so you can nudge the customer without leaving the page. Resending is unlimited and tracked per-channel.
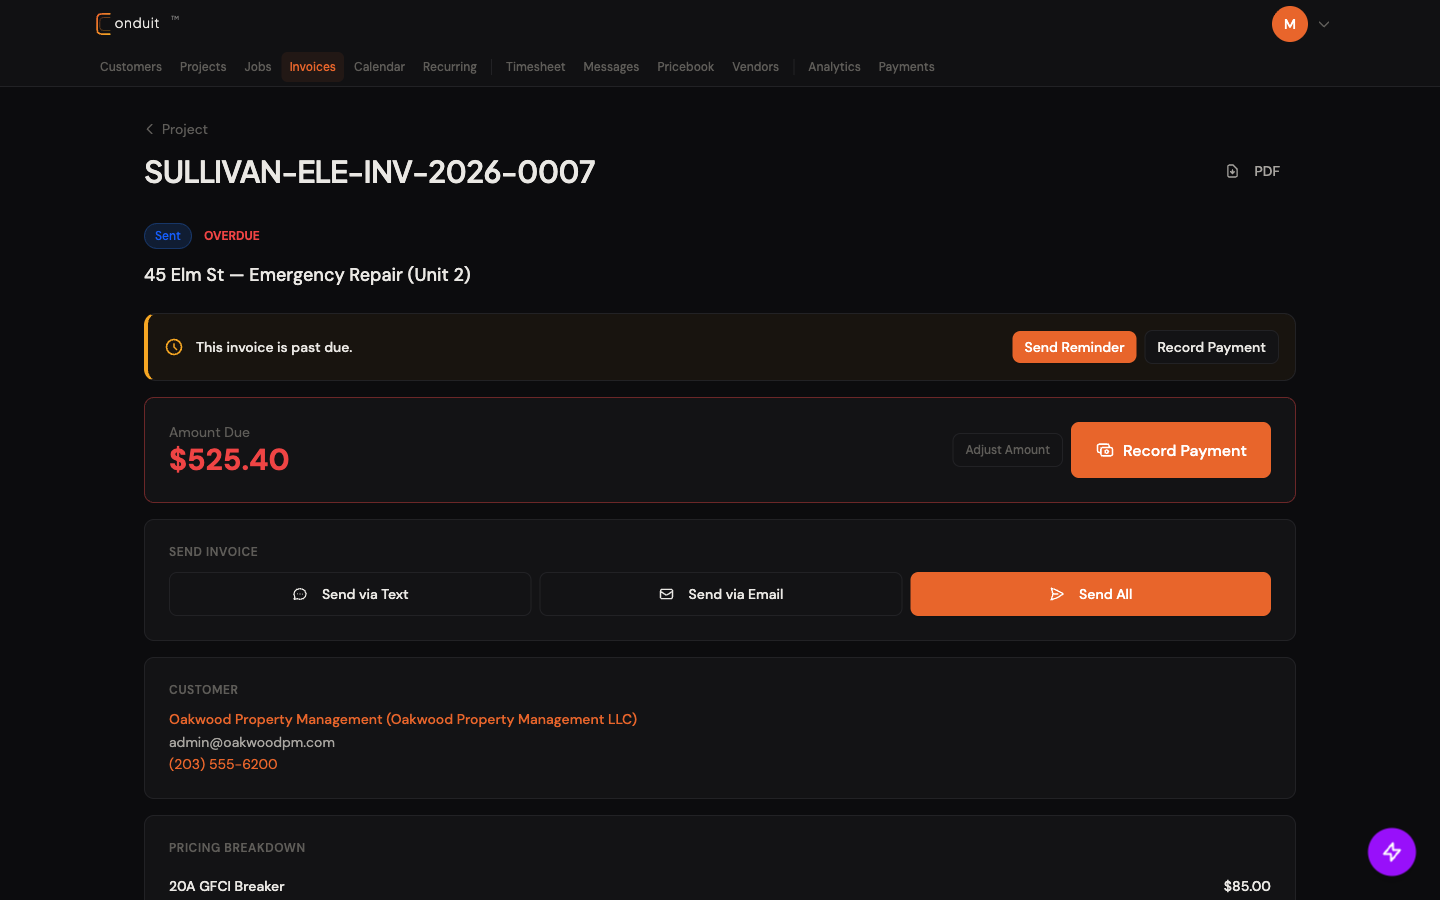
- 1. Send via Text
- 2. Send via Email
- 3. Send All
- 4. PDF download
- 5. Status badges (Sent, Overdue)
- 6. Send Reminder (only shows when past due)
The customer opens the link to a clean payment page with your logo, line items, total, and a Pay Online button (covered in the next tab).
05Customer pays
What the customer sees
When your customer opens the payment link from the SMS or email, they get a clean, branded payment page on their phone or desktop. No app to install, no Conduit account required.
- Your company branding at the top so they know it’s a real invoice from you, not spam.
- Invoice number for their records and yours when they reference it on the phone.
- Customer + Due date so the right person knows what’s owed and when.
- Line items with quantity, price, and total — same data you see on the contractor side.
- Totals block — Subtotal, Tax, Total, Amount Due.
- Pay Online block — once Stripe Connect is set up, this shows a Pay Online button that handles ACH and credit card. Until you connect Stripe, this block shows your phone and email as a fallback so customers can reach out to arrange payment manually.
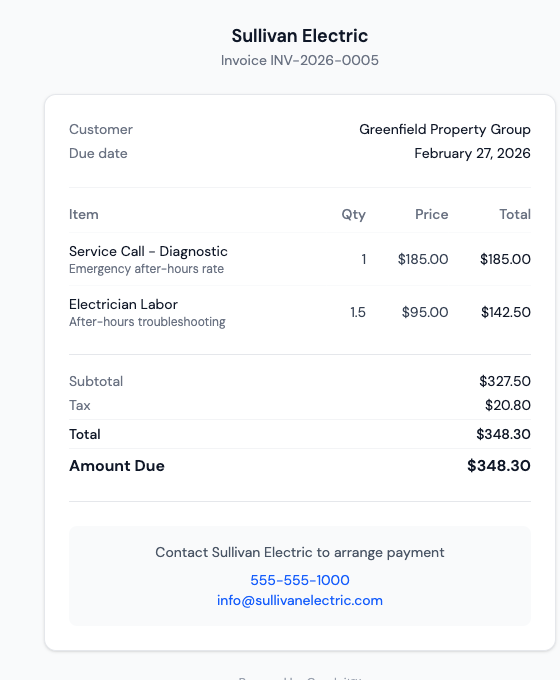
- 1. Your company branding
- 2. Invoice number
- 3. Customer + Due date
- 4. Line items (Item / Qty / Price / Total)
- 5. Totals block (Subtotal / Tax / Total / Amount Due)
- 6. Pay Online block (Stripe button when connected; contact info as fallback)
Fees and timing
When customers pay through the portal, fees come out of the deposit before it lands in your bank account:
- ACH bank transfer. Conduit’s platform fee is $1 flat, Stripe’s processing capped at $5. Total: $6 max on any invoice. On a $10,000 invoice, you pay $6.
- Credit card. 2.9% Stripe + 1% Conduit = 3.9% total. On the same $10K invoice, that’s ~$390.
Money hits your bank account in 3-5 business days for ACH, 2 business days for card.
For payments outside the portal (check, cash, phone), record them manually on the invoice detail page: Record Payment → Method (Card / ACH / Check / Cash / Other) → Amount → Check number (if applicable) → Notes → Save. Partial payments work the same way; the balance reflects whatever’s left.
Once they’ve paid
Whether the customer paid through the portal or you recorded a manual payment, the contractor-side invoice page reflects the paid state with a clear status chip and confirmation banner.
- Paid status chip (green) replaces the prior Sent / Overdue badge at the top of the invoice.
- “Paid in Full on [date]” banner under the title — quick visual confirmation with the date the balance hit zero.
- Customer card stays for reference (so you can call them back about the next job).
- Pricing Breakdown is read-only at this point — the invoice is closed.
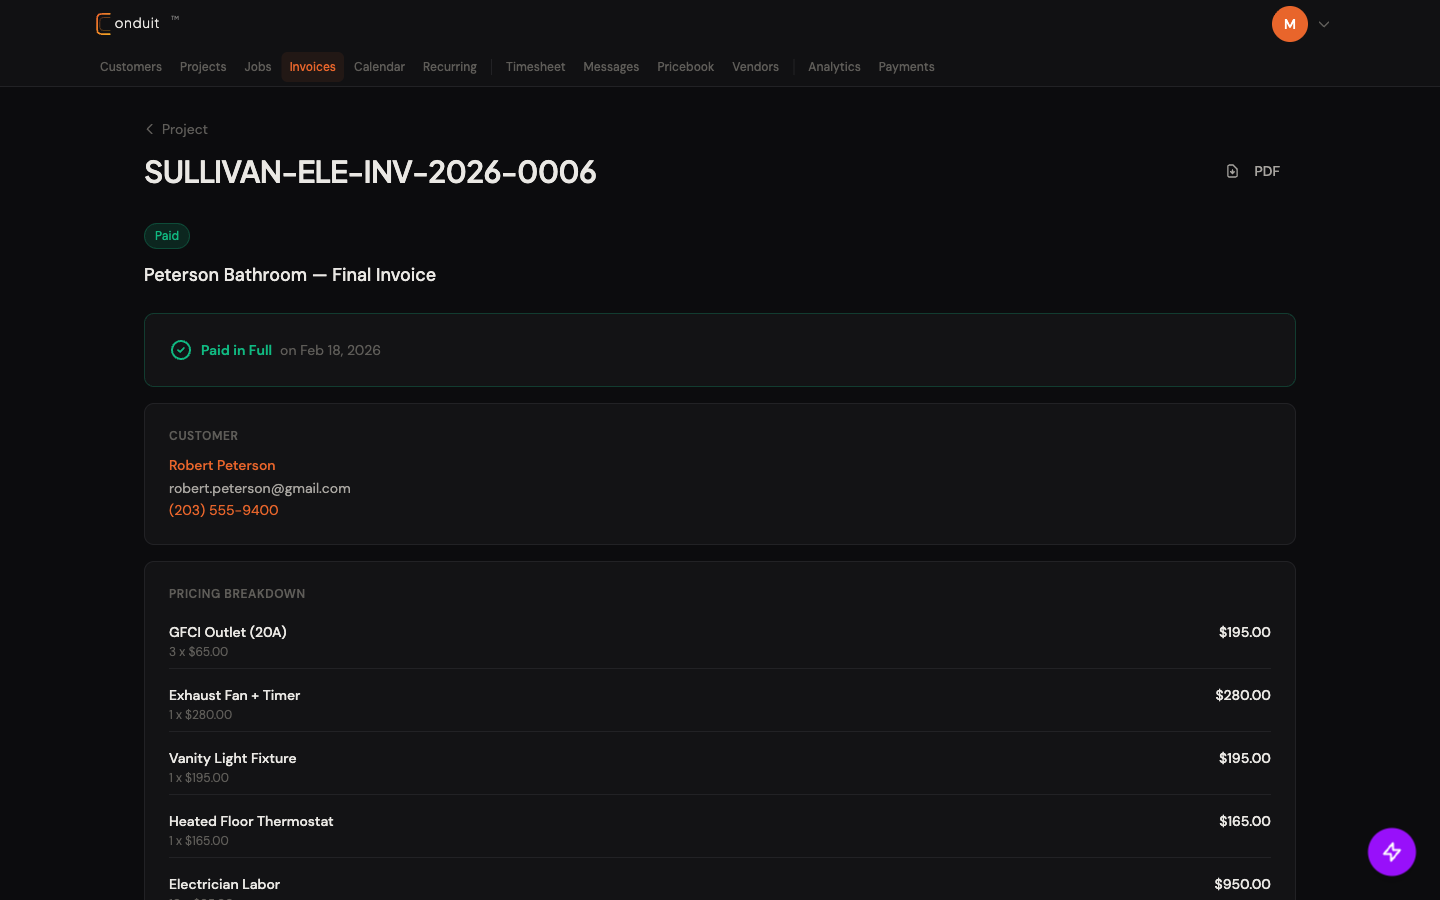
- 1. Paid status chip (green)
- 2. 'Paid in Full on [date]' banner
- 3. Customer card (kept for reference)
- 4. Pricing Breakdown (read-only)
That’s the loop closed. Work done, invoice sent, cash in. The next guide goes deep on invoicing itself: Invoicing and Payments deep dive.